

Step 3: With right sides together, line a background rectangle up with the brown rectangle. Sew down the short side where they are lined up. The seam allowance is one quarter of an inch, or the edge of your presser foot. Open it up, match the other rectangle to the brown rectangle and sew again. 
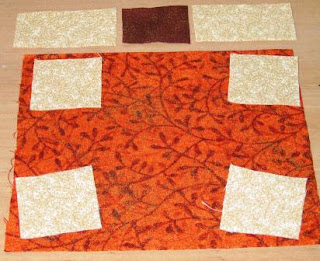
 Step 4: Iron all seams open. So far your two pieces should look like this.
Step 5: With right sides together, line up the raw edges of the pumpkin body and trunk piece. The lengths will only match on two edges, since the pumpkin isn't square. Either of the two edges will work, just make sure the two lengths line up right. 
Step 6: Sew down the length of the edge where the trunk and pumpkin pieces are lined up. Iron it open. Your pumpkin block is now complete.  It should make a 6 inch square. You can now finish it how you want. I machine quilted mine with metalic thread and made a hot pad out of it. Now that you've made one you can experiment with other sizes. You can make short round pumpkins or tall skinny pumpkins. Make pillows, quilts, table runners, what ever you want. Sorry I made this one a weird size, since most quilt blocks end up being 6.5" to account for seam allowance. Oh well, you get the drift of how to make it.

4 comments:
So I'm starting to get really into quilting... I'm currently in fabric collection mode. Do you always do machine quilting on your own? Do you have a walking foot, or do you just drop the feed dogs and go for it? Do you ever send your stuff out to be long-arm quilted? I'm wondering how easy machine quilting is. My mom has had someone else do all of her quilting, but I kind of want to do it myself...
I do my own, but it gets pretty tricky if you do anything larger than a baby quilt. You have to be really careful or the back will pucker. To make it look stippled/squigly, I drop the feed dogs and use a darning/embroidery foot. I really think it's why I love quilting so much--you can just go crazy with it. If the fabric has a square or simple pattern then I'll follow it with a walking foot. I've thought about sending some out to be done professionally, but it costs at least 1 cent per square inch, and it would have cost $100 to do our wedding quilt and I didn't want to pay that much...so that one I just tied :o) Hmm, e-mail me if you have more questions. Next time I'm down there I'd love to show you how I do it.
I definitely want to have someone show me the "freestyle" method of machine quilting. First I need to make a quilt top... I've been collecting fabric. That is just way too much fun.
Hello, I ran across your blog, and have to say that I love it! Thank you for all your craft ideas, I am LDS also, and love all the ideas to share with my ward. You are great!
-Samantha Fife
Post a Comment