
This is a combination of a stuffed animal and a blanket. It is nice to have when your child is in the security object stage because then you don't have to haul a blanket and stuffed animal every where you go, you can just bring this along. You can make the blanket part any size you want...I have made them from burp rag size to crib blanket size...it kind of depends on what size of stuffed animal you use. The bigger the animal the bigger the blanket part will need to be in order to coordinate and look right.  First you need to gather your supplies. You will need a stuffed animal. Thrift shops are a great place to look. They usually have a large selection, the price is low, and a washer and dryer does wonders! You will also need enough material for the size of blanket you want. I like to use flannel. You can use the same fabric for the front and back of the blanket, or you can use two coordinating fabrics. You will also need thread to match and batting if you want the blanket to have any loft to it...it's up to you. I've done it both ways. If the blanket is crib size I would recommend using batting, but if the blanket is smaller then the two layers of flannel will work fine.
  Next you will perform surgery to the stuffed animal. It is kind of morbid in a toy sort of way...you might not want your children to watch. Cut the animal in half, making sure there is enough room below the arms and above the legs for a seam allowance. If it is stuffed very full you'll have to remove some stuffing. Pin the openings shut and baste down the opening so that it is closed and stuffing can no longer escape.
  Lay the batting down and put your backside material on top of it. Then find the middle on each side and pin your animal to it. Make sure that the animal's head and bottom will be facing the same direction when you turn the blanket right side out after sewing it. (You don't want its head looking up and its bottom facing down).
First you need to gather your supplies. You will need a stuffed animal. Thrift shops are a great place to look. They usually have a large selection, the price is low, and a washer and dryer does wonders! You will also need enough material for the size of blanket you want. I like to use flannel. You can use the same fabric for the front and back of the blanket, or you can use two coordinating fabrics. You will also need thread to match and batting if you want the blanket to have any loft to it...it's up to you. I've done it both ways. If the blanket is crib size I would recommend using batting, but if the blanket is smaller then the two layers of flannel will work fine. Next you will perform surgery to the stuffed animal. It is kind of morbid in a toy sort of way...you might not want your children to watch. Cut the animal in half, making sure there is enough room below the arms and above the legs for a seam allowance. If it is stuffed very full you'll have to remove some stuffing. Pin the openings shut and baste down the opening so that it is closed and stuffing can no longer escape. Lay the batting down and put your backside material on top of it. Then find the middle on each side and pin your animal to it. Make sure that the animal's head and bottom will be facing the same direction when you turn the blanket right side out after sewing it. (You don't want its head looking up and its bottom facing down). Then with right sides together, pin your front side material to the edges of the other material and batting. Pin the edges of the animal good to make sure you catch it when you sew around the edge. After you pin it all, sew around the edge leaving an opening to turn it right side out. Make sure you catch the all of the animal's raw edge. I usually back stitch on each side of the animal to make sure it's good and secure. I use a 1/2" seam allowance. I zig-zag the edges and then clip the corners as well. Turn right side out. 
 Next you want to pin the layers together to avoid any puckering later on. Make sure the lay of the top layer matches that of the bottom layer. Don't get lazy with this part. After it is pinned together well you can machine quilt it. Start in the middle and work your way out to the edges. Doing this helps prevent puckers.
 Slip-stitch the opening closed. You are now finished! Congratulations :o)
Next you want to pin the layers together to avoid any puckering later on. Make sure the lay of the top layer matches that of the bottom layer. Don't get lazy with this part. After it is pinned together well you can machine quilt it. Start in the middle and work your way out to the edges. Doing this helps prevent puckers. Slip-stitch the opening closed. You are now finished! Congratulations :o) 

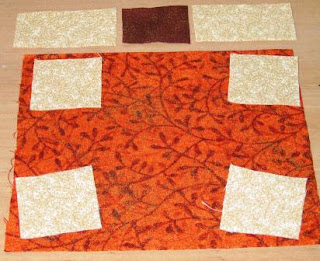


 Step 4: Iron all seams open. So far your two pieces should look like this.

 It should make a 6 inch square. You can now finish it how you want. I machine quilted mine with metalic thread and made a hot pad out of it. Now that you've made one you can experiment with other sizes. You can make short round pumpkins or tall skinny pumpkins. Make pillows, quilts, table runners, what ever you want. Sorry I made this one a weird size, since most quilt blocks end up being 6.5" to account for seam allowance. Oh well, you get the drift of how to make it.

