Friday, December 19, 2008
Mod Podge Plate

Tuesday, December 9, 2008
Wednesday, November 26, 2008
Christmas Advent Calendar
This is a mini-muffin tin disguised as an advent calendar. It is probably one of my favorite projects ever. I love Christmas time because there are so many cute craft ideas. My sister-in-law gave these as gifts last year and I got the idea from her. You simply decorate a card for each day leading up to Christmas and apply magnetic tape to the backside of it. Then fill each cup with a Hershy's Kiss or other treat and cover each cup with the decorated cards. It's exciting to see what treat each new day brings. The best part of it is that it doesn't take up very much room. After Christmas simply pull each card off, store them away and use the muffin tin for its intended purpose the rest of the year :-) If you give it as a gift you can give it with some muffin mix and a card that says "you're gettin' muffin for Christmas." Happy Thanksgiving tomorrow and Merry Christmas after that.


Monday, November 17, 2008
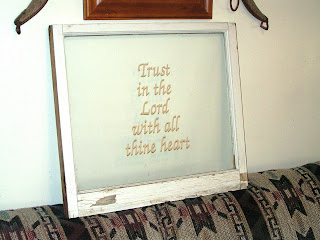
Antique Window with Vinyl Lettering
 Supplies:
 - Window with wooden frame
- Vinyl Lettering in phrase of your choice
Make sure to wash the window well (and get rid of any spiders like I had to). On the side of the window opposite of where you want your text, mark the window with a dry erase where you want your text to be. This will allow you to line your words up properly. Flip the window over so it's right side up now. Peel the backing from the vinyl lettering and place it over your marks from the opposite side. Rub over each letter with a popsicle stick. Unpeel and erase the dry erase marker. Tada!
Wednesday, November 12, 2008
A new post is in the plans...
Monday, September 29, 2008
Cuddly Buddy

 First you need to gather your supplies. You will need a stuffed animal. Thrift shops are a great place to look. They usually have a large selection, the price is low, and a washer and dryer does wonders! You will also need enough material for the size of blanket you want. I like to use flannel. You can use the same fabric for the front and back of the blanket, or you can use two coordinating fabrics. You will also need thread to match and batting if you want the blanket to have any loft to it...it's up to you. I've done it both ways. If the blanket is crib size I would recommend using batting, but if the blanket is smaller then the two layers of flannel will work fine.
  Next you will perform surgery to the stuffed animal. It is kind of morbid in a toy sort of way...you might not want your children to watch. Cut the animal in half, making sure there is enough room below the arms and above the legs for a seam allowance. If it is stuffed very full you'll have to remove some stuffing. Pin the openings shut and baste down the opening so that it is closed and stuffing can no longer escape.
  Lay the batting down and put your backside material on top of it. Then find the middle on each side and pin your animal to it. Make sure that the animal's head and bottom will be facing the same direction when you turn the blanket right side out after sewing it. (You don't want its head looking up and its bottom facing down).

 Next you want to pin the layers together to avoid any puckering later on. Make sure the lay of the top layer matches that of the bottom layer. Don't get lazy with this part. After it is pinned together well you can machine quilt it. Start in the middle and work your way out to the edges. Doing this helps prevent puckers.
 Slip-stitch the opening closed. You are now finished! Congratulations :o)
 I'm Back

Wednesday, September 17, 2008
I borrowed my friend's machine and I've never had so much fun in my life! She has a really nice Janome that's computerized. It had two different alphabets on it and a huge variety of stitch patterns that you could program however you wanted. It is worth nearly 3 times as much as I paid for my first car (granted my car was only $500, but still!). Unfortunately I don't have that kind of money to spend on a sewing machine...even though that thing was a dream! I still wasn't able to finish the baby shower gift though because she couldn't find her embroidery foot.
I decided that a new machine is out of the question for now with a new baby coming soon and everything. So I'm scouring the classifieds and Craigslist to see if I can find a good used one. Any suggestions? If that doesn't work I'll probably end up getting a new pedal for mine. Hopefully I'm back to sewing (and posting) again soon.
Wednesday, September 10, 2008
HELP!
Wednesday, September 3, 2008
Pumpkin Quilt Block Tutorial


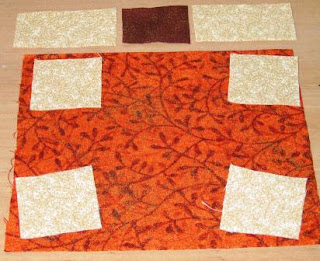
Step 3: With right sides together, line a background rectangle up with the brown rectangle. Sew down the short side where they are lined up. The seam allowance is one quarter of an inch, or the edge of your presser foot. Open it up, match the other rectangle to the brown rectangle and sew again. 
Step 5: With right sides together, line up the raw edges of the pumpkin body and trunk piece. The lengths will only match on two edges, since the pumpkin isn't square. Either of the two edges will work, just make sure the two lengths line up right.
Step 6: Sew down the length of the edge where the trunk and pumpkin pieces are lined up. Iron it open. Your pumpkin block is now complete. 
Leaf Garland


Monday, August 18, 2008
Dryer Hose Pumpkins
 Since fall is approaching and since every other item on here is baby related, I decided I should include this post. I can't remember where I saw this idea, but it was a long time ago. I finally got around to making them last fall. You'll need some craft wire, orange spray paint, 1" diameter driftwood for the stems, some silk flower leaves, and flexible dryer hose. If I remember correctly, 12 feet of hose made three pumpkins, but I might be wrong. I prefer the vinyl kind. I think the foil looking type tends to be more wrinkly.
 Family Tree


Onesie Card
 This card is quick and easy. It could be used for a baby shower invitation, thank you card, baby announcement, or whatever you want. I prefer to use eyelets for the snaps, but I ran out of pink eyelets so the card in the picture has buttons (that don't quite match--oh well). The pattern and instructions are below. Enjoy:o)


